- Homesteading
- Project Portfolio
- Building Bliss
Building Bliss
The Storage Shed on a Skid Foundation
In the process of preparing to build our house, first of all the building site had to be cleared - of a mobile home, that we live in.

Storage sheds seem to be our specialty, with recycling materials scrounged and salvaged from various carpentry jobs and demolition projects being lovingly reused.
Building Bliss was necessary to contain the overflow of the mobile while it's moved, while still having access in case we need the various things in storage is crucial. Having on site storage for our household goods in much better than renting a storage unit, for instance.
The best part? This little shed can be used for overflow accommodation for visitors (with a bit of renovation), or moved to a better site whenever we like, because we built it with a skid foundation.
The site for building this storage shed is actually the original house site, which we didn't have the budget for building on this year - making a shed on skids so it can be moved in the future is the answer.
We had a few salvaged materials to choose from, some reused from The Tallyman Shack, as well as logs felled on the property, so two of those made up the skid portion of the project; see more details as Mike yet again steps up to the plate:
 Site preparation - two logs are selected and trimmed to the right length - in this case, 10' long as the building itself will be 8' square - these will be the skid foundation
A chain saw is essential for this stage, much as I love old hand tools, it would take so much effort and time.
 2x6" framework is squared up and screwed into the logs. Leveling with shims and lumber ensures that the floor of the building will be level.
Long decking screws will work the best for this project - less chance of them rusting, and giving way.
 Installing the floor joists cut to length.
 Pre-fabbed walls are light enough to move with people power...these had holes drilled into the bottom plate, and castors were put on to make them easier to move uphill.
This was actually a lot of fun - talk about thinking outside the box. I knew we kept that crate of castors for a reason, even though we couldn't imagine what that would be at the time.
 Walls are all in place, screwed to the edges of the flooring. Interior bracing holds everything square...
Now you see it taking shape it's a lot easier to imagine the rest of it.
 Roof rafters salvaged from the demolition of The Tallyman Shack are installed one at a time to the front and back headers
Which is this stage; the roof is getting done, the walls are up, and it starts to look like a real building.
 Finally - just in time for a rainstorm, lock up!
To keep that rain out, we use, what else? a piece of lumber wrap from the local hardware store. They have a lot on hand that will go to the landfill if you don't give it another life.
 The name says it all - it's blissful to have a project all coming together...
There's more to Bliss than just a shed; she's been put to use as an experimental station to test out different ideas for siding. There is nothing quite so fun as this type of siding for a funky shack. We also used old canning jar lids to make fish scale detail (this link opens in a new window).
You might like these
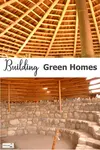
Building Green Homes; alternative building techniques and materials
Building Green Homes is nothing new; our ancestors did it as a matter of course, using whatever materials were abundant and cheap, close to hand...
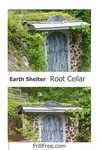
Earth Shelter Root Cellar with Cordwood Walls and a Living Roof
The Earth Shelter Root Cellar was a trial to see how exactly to build into a hillside, and the cordwood walls and living roof were also experimental; the lessons learned...
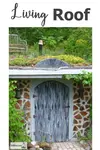
Living Roof; green, growing and lush to protect the home
A Living Roof over your dwelling provides shelter for the roof itself, as well as habitat for small creatures and insects, water collection and storm water abatement; there is no downside


See more projects in the portfolio...


