Jacki Cammidge is a Certified Horticulturist specializing in frugal, low-input gardening and propagation, with lifelong hands-on experience and years as a wholesale nursery head propagator.
- Frill Free Horticulture
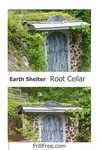
- Earth Shelter Root Cellar
- Building the Root Cellar
Building the Root Cellar
A Project Journal with Costs + Lessons Learned
Glory Be is the earth sheltered cordwood root cellar that we built to test out different techniques; designed from scratch, there is nothing common about this little building!

If you're going to attempt a project like this, it's important to think through every aspect of it; although we did intensive research, there's not a lot out there on this lost art of building a root cellar.
So, we designed it by the seat of our pants.
Excavating the Root Cellar Site;
I determined that the ideal place to build a root cellar was right
into the hillside, using the mass of the earth to shelter it and keep it
at a relatively stable temperature. The site faces due south, which will help keep the root cellar frost free in the winter.
A neighbor with an excavator was enlisted to dig out a hole.
After much deliberation, losing a track on the hoe and almost falling into it, a hole was dug.
 Bigger machines don't necessarily translate into better...
Most of the soil was sandy, with a few large rocks at the bottom, so drainage isn't a problem here.
The hole was around 3 meters deep (10 feet), and 3 across to make a finished root cellar of around 2.4m square (8 feet)
The actual usable size was a little smaller, due to the way it was constructed, with the metal on the outside and the frame on the inside of the root cellar.
 The finished excavation hole...
A small footing was built with concrete, and a frame of 2x4" lumber was constructed.
On the outside of this frame was screwed metal roofing which was carefully back-filled with the soil.
The floor is just earth, with a layer of gravel over top.
This ensures the higher humidity for vegetables such as carrots that keep longer when kept moist.
 The framework of the earth sheltered root cellar is in place on the footing...
Fall is a good time to build underground structures; the soil is generally dry and not frozen (usually). If you are in a fairly arid climate, you'll be surprised at the level of the damp soil - it's not as deep as you might think.
 Yes that's Jacki...
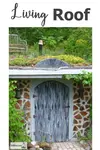
Building the Green Roof;
A roof of two layers of oriented strand board topped with rigid blue foam insulation, and then a large piece of rubber roofing above that was constructed.
The epdm rubber roofing was purchased from a pond supply company. It comes in two widths so I adjusted the measurements of the root cellar to accommodate the narrower size of 16' - 5 meters approximately.
This allows for an overhang down the sides to
prevent excess moisture from getting to the foundation which would increase
the humidity inside. It is already humid enough.
 Winter the first year was a trial...
Once the rubber was in place, a layer of old hay was put over the insulation of blue board Styrofoam.
(It was discovered later that the ants love to burrow in the blue board, and sprinkle it in little piles on the floor - in hindsight, it would be better to actually pour a thin layer of concrete, then put the insulation above that, then the rubber, then the backfilled soil.)
The roof was back-filled with between eight and ten inches of soil, and eventually planted with many different Sedum; I especially recommend these green roof Sedum.
For a different system of building your green roof, see how I built a modular green roof for a quick and economical option.
The Cordwood Walls;
 Just a test; the cordwood will look spectacular!
The front walls were built out of one foot (30cm) long larch cordwood, which was mortared with a mix of Portland cement, damp sawdust, lime and sand.
This was mixed in small batches in a wheelbarrow, as each layer of cordwood has to set up before building the next.
I stacked the cordwood in place to dry before mortaring them together.
The book by Rob Roy Cordwood Building, The State of the Art, was an invaluable resource while building the root cellar.
This book contains the recipe used for the mortar, and was extremely useful for the many hints and tips it contains, too.
If you only invest in one book when you're building your homestead, make it this one. The advice is so right on the money, and besides, it's a good read.
The Rustic Painted Door to the Magical Kingdom;
 Rustic painted door - this has always been one of my favorite projects...
Building the homemade rustic painted door was fun; it’s made of two layers of plywood over a frame of two inch thick lumber filled with rigid blue insulation.
I painted the outside to look like old wood, and surprisingly, after more than four years of full sun, winter cold and lots of abuse, it’s still looking as though I only just painted it.
The paints were acrylic craft paint, coated with two layers of spray on urethane.
Inside the Root Cellar;
 Plywood shelves on 2x4 lumber supports hold up the roof too...
2x4" lumber supports both the plywood shelving and the roof which is two layers of oriented strand board (OSB). You can see the metal roofing on the outside of the framing to hold the soil back. The floor is just virgin gravel, to enable it to stay humid inside, and also to drain.
How much did this root cellar cost?
The price of building Glory Be was the cost of the excavation, which amounted to about $200 because we made a deal with the operator - fuel costs a lot, so we covered that, plus a bit of an hourly rate for the machine. You will need to do some research to find a qualified operator in your area, but expect to pay about $150-400 an hour.
It took about five hours to dig, but that would vary depending on what kind of soil, the size of the machine, and the experience of the operator.
The wood for the stud walls was around $200 also. You could use almost anything that is recycled or salvaged, which would be cheaper still. Most of it is 2x4, with some 4x4 posts for the ceiling and the front wall.
Metal roofing salvaged from another job is used for the walls, on the side where it's exposed to the soil.
Half a cord of larch fir firewood, a bag of cement powder, some lime, and sawdust is what you'll need for the front wall.
The roof is layers of Styrofoam blueboard, over a ceiling of two layers of oriented strand board (OSB) and topped with rubber roofing, which is the most expensive part of the project - around $140 for that. The whole thing is topped with a foot of native soil, with the rocks removed.
Grand total; less than $1000 for the entire shebang.
The sides of the root cellar are made of metal roofing, facing out.
This repels moisture, pests and also forms a retaining wall to hold back any soil from falling in.
The roof is insulated with not only earth and plants, but Styrofoam Blue Board as well.
Rubber roofing, or EPDM comes in various lengths and widths.
Get it wider than what you think you'll need - it's easier (and cheaper) to cut off a bit, than to be two inches short.
 Building this Cordwood and Earth Sheltered Root Cellar was a fun project...
FAQ:
How long did it take to build the root cellar?
How long did it take to build the root cellar?
The actual digging of the hole in the hillside took place in the early fall, then the main construction was done before the snow fell. There was a bit of a hiatus during the winter, then the whole thing was completed the next summer. All in all, if you worked right through, it would take a few months.
What is the biggest drawback or problem with the root cellar, if any?
What is the biggest drawback or problem with the root cellar, if any?
The only problem that occurred was the ants liking to dig holes in the Styrofoam blue board insulation in the roof. They have been the only issue with this project. Everything else was above expectations.
You might like these
Earth Shelter Root Cellar with Cordwood Walls and a Living Roof
The Earth Shelter Root Cellar was a trial to see how exactly to build into a hillside, and the cordwood walls and living roof were also experimental; the lessons learned...
Living Roof; green, growing and lush to protect the home
A Living Roof over your dwelling provides shelter for the roof itself, as well as habitat for small creatures and insects, water collection and storm water abatement; there is no downside
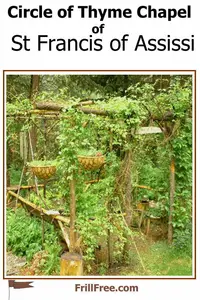
The Circle of Thyme Chapel of St. Francis of Assisi
The Circle of Thyme Chapel of St. Francis of Assisi is a twig gazebo built on a whim for the clematis to clamber up - it was more successful than we ever imagined...
 Jacki Cammidge
AUTHOR BIO
Jacki Cammidge is a Certified Horticulturist who helps gardeners grow more with less through low-input, budget-friendly gardening and propagation. She has gardened her whole life, served as head propagator at a wholesale nursery, and handled thousands of rose and juniper cuttings.
Readers can find her at Frill Free on Facebook and Pinterest. Her frill-free approach was forged in northern BC, where horse manure, leaves, salvaged sawdust, and a deer-tested raised bed built her garden from scratch.


