Jacki Cammidge is a Certified Horticulturist specializing in frugal, low-input gardening and propagation, with lifelong hands-on experience and years as a wholesale nursery head propagator.
- Frill Free Horticulture
- Seed Planting
- Germinating Seeds
Germinating Seeds
Helping Them Break Out of Their Dormancy
Seeds really are amazing. They contain everything necessary for a new plant to form; the germ, or tiny plant, a source of food while it's getting going, and protection from the elements or foraging animals.

Some seeds have evolved to need the animals to break down the seed coat before the plant can germinate. In others, they need winter cold and freezing temperatures to break dormancy. Sometimes, more than one freeze / thaw cycle is needed.
A lot of seeds, like many annuals, only require moisture, and warm temperatures to be happily encouraged.
Others have to have a certain number of warm days, where the temperature is above a specific amount. This protects them from germinating prematurely, putting themselves at risk of freezing when the weather changes again, as it often does in the spring.
 A 'Rag Doll' for germinating seeds
In some cases, the seed coat is so hard that a plant will need even more help than what they get from nature. They require scarification, which means scraping a bit of seed coat away so the plant can break out of its shell.
 What's inside the 'Rag Doll'
These include a lot of leguminous plants - here is an example. Clitoria ternatea is the Butterfly Pea which is an annual vine in our area, so it's important to get them started early so they have time to grow and produce the gorgeous blue flowers.
 The germinating seeds after scarifying
After scarifying, I put them into a 'rag doll' to germinate. This ensures that they are really ready to grow, and can be moved to a pot of soil for the next stage.
A rag doll is a piece of paper towel, folded in half, with the seeds in between. The paper towel is dampened, and then put into a plastic zip loc bag until all the seeds that are going to, have germinated.
 Success! Lots of seeds germinating!
This can take a week or two, but in this case, even though the seeds were old, started in less than twelve hours! Make sure you check often, and early.
Move the newly germinated seeds, showing just the tiny white radicle, or root, into a pot of sterilized potting soil.
I usually dibble a shallow row, put each individual seed into the depression, then spray with warm (tempered, or room temperature) water. This settles the soil against the seed.
If you want, you can put a cloche over top.
What's a cloche? That would translate as a hat, but in this case means a glass or plastic cover. I use a clean jam jar or canning jar, or in some cases, put the whole pot into a light weight plastic bag.
When you pre-sow small seeds, like lettuce, or other greens, it's a good idea to sow them in rows in the flat.
This makes it much easier to transplant them - you just run your hand under the seedlings, and pull them up in a clump, instead of trying to find the edge of the seedlings if they cover the whole surface.
Winter Sowing
What does that mean? Winter sowing is an ideal, and lazy, way to deal with plants that require a cold dormant period to break the seed coat.
Some also require scarification, or the filing of the seed coat to allow moisture in to start the germination process.
 Cut the milk jug about two inches (5 cm) from the bottom
For those that need the cold period of stratification, you can use a milk or water jug, or even a vinegar jug, but don't use any kind of bleach or other cleaner for this, there would be no guarantee of success.
Cut the top almost all the way off, around two inches (5cm) from the bottom. Leave a hinge, so you can easily replace the top, a crucial part of this method.
 Fill the bottom of the milk jug with sterilized dampened soil, and sow the seeds
Then put a few handfuls of dampened sterilized potting soil or seed starting medium in the bottom. Sow the seeds thinly on top of that, most don't need covering but you can sprinkle turkey grit or other small sized gravel over it.
Then tape with duct tape around the bottom to join it back to the top to make a little greenhouse to protect the contents.
 Place the jug where it will be undisturbed until spring time
Check in the spring by opening the top lid, if there are green sprouts, congratulations! You have germination.
Take the top off, to start hardening the seedlings off. When they're big enough, transplant them into separate pots.
By fall, they should be big enough to transplant into their eventual spot in the garden, or into a nursery bed to continue growing up.
You might like these
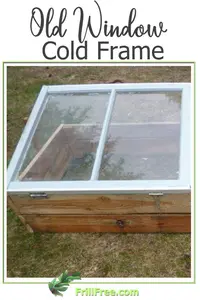
Old Window Cold Frame - make a protective place for seedlings
Make a protective place for seedlings and more with an Old Window Cold Frame...
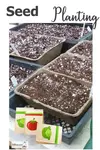
Seed Planting - growing your own vegetables from seeds
Seed Planting is a time honored way of growing your own vegetables; don't worry, it's not that hard...
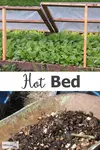
Hot Bed - how to start your seedlings early
A Hot Bed gives you a jump on the season for starting vegetable seeds; learn how to use compost for bottom heat and get started early...
 Jacki Cammidge
AUTHOR BIO
Jacki Cammidge is a Certified Horticulturist who helps gardeners grow more with less through low-input, budget-friendly gardening and propagation. She has gardened her whole life, served as head propagator at a wholesale nursery, and handled thousands of rose and juniper cuttings.
Readers can find her at Frill Free on Facebook and Pinterest. Her frill-free approach was forged in northern BC, where horse manure, leaves, salvaged sawdust, and a deer-tested raised bed built her garden from scratch.


