- Frill Free Horticulture
- Garden Setup
- Easy Composting Area Setup
Jacki Cammidge is a Certified Horticulturist specializing in frugal, low-input gardening and propagation, with lifelong hands-on experience and years as a wholesale nursery head propagator.
Easy Composting Area Setup
Design It To Be Simple
Designing your own easy composting area setup doesn't have to be too complicated. Keep it simple and let it all flow.
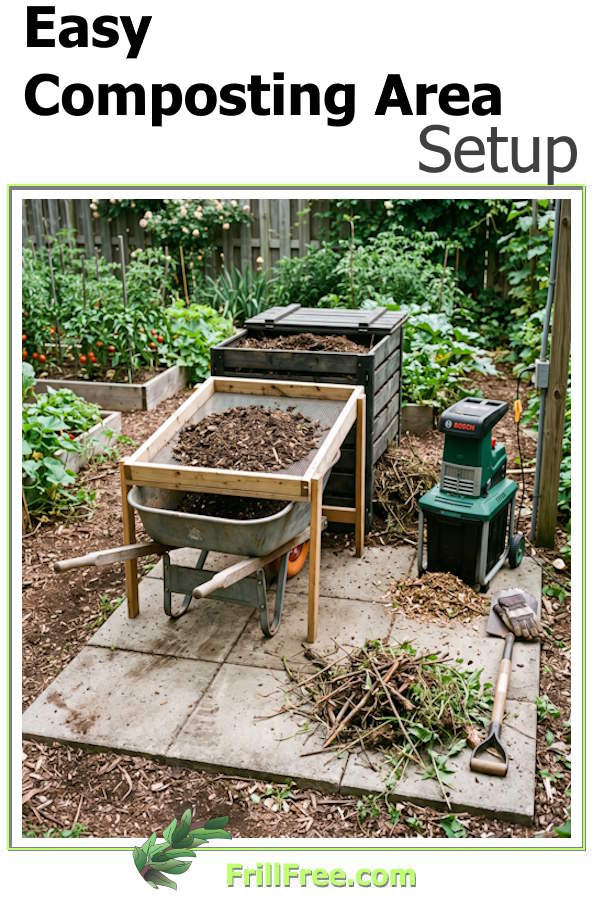
When setting up the space around a compost bin, think of it less as a
single container and more as a small work area. A good layout makes it
easy to bring materials in, manage the pile, and remove finished compost
without extra lifting, dragging, or mess.
First, leave enough
open space around the bin. Try to keep at least three to four feet of
clear working room in front of it. That gives you space to stand, turn
the pile, and load or unload a wheelbarrow.
If the bin has a lid or front access panel, make sure nothing blocks it. Side access can also be useful if you need to reach in with a fork or shovel.
The ground surface matters too. A muddy or uneven area quickly makes composting feel like hard work. If possible, create a stable path from the garden or kitchen door to the bin using mulch, gravel, pavers, or stepping stones.
You'll thank me in the winter when you have to slog through a foot of snow to get to the bin.
Around the bin itself, a firm surface helps when pushing a wheelbarrow in and out. You do not necessarily need to pave the whole area, but you do want footing that stays usable after rain.
Wheelbarrow access is one of the best things to plan in advance. Ideally, the front of the compost bin should face the direction from which materials usually arrive and the direction in which finished compost will leave.
In other words, if you expect to bring in garden debris from one side and roll compost to the garden from another, think about the easiest flow before placing the bin.
Park the wheelbarrow directly in front of the access point when loading or emptying. If space allows, leave a flat parking area just beside or in front of the bin so the wheelbarrow does not tip or sink while you shovel.
Screens can also make the process much easier, especially when harvesting finished compost. A compost screen is usually a wood frame or metal frame fitted with wire mesh. You place it over a wheelbarrow, tub, or second bin and shake or rub partly finished compost through it.
The fine, finished material falls through, while sticks and larger chunks stay on top and can go back into the pile.
For convenience, store the screen right near the compost area, either hung on a fence, leaned against a wall, or mounted on hooks nearby. It helps if there is enough room beside the main bin to set the screen over a wheelbarrow without blocking your path.
If you have the space, a two- or three-zone setup works especially well.
One area can hold fresh materials waiting to be added, another can hold active compost, and a third can be used for finished compost or screening.
Even a simple extra corner for a pile of dry leaves or browns like small wood chips or sawdust can make the bin easier to manage. That way, whenever you add food scraps or wet grass, you have cover material close at hand.
It is also smart to think about storage. Keep a fork, shovel, or compost aerator nearby so you do not have to search for tools each time. A small covered container for dry browns, a hook for gloves, and a nearby spot for buckets or tubs can make the area feel efficient and tidy.
The space around the compost bin should support movement.
You want a clear path in, enough room to work, a stable place for the wheelbarrow. You will need to allow for access with a wheelbarrow.
Keep in mind that turning a wheelbarrow requires more room, especially if fully loaded, so any corners will need to be wider. Our access paths are around 4' wide, and turning areas are 5-6'.
A fence or other structure will be a good nearby spot for screening and tools. A cover to keep the rain off the tools helps protect them from the weather.
With a little planning, the compost area becomes much easier to use from start to finish.
You will also want to think about preventing vermin from moving in. Make the bottom of the compost bin solid, and if possible make it difficult for rats to dig underneath it. Cover the top with wire mesh - use your screens and make them do double duty as a vermin repellent.
My easy composting area setup wasn't designed, but grew organically as we needed. Building the first stacking modules was the beginning, and fortunately they can be moved easily to go to the next block, or right across the garden if necessary.
This means I can relocate them and start an entire new gardening area within minutes, rather than hours or days.
This method has been the most economical way to utilize dimension lumber. Whatever the size (ie: 6", 8" or even bigger), they can all be used for a square module as long as they are all the same size in the end. I've found this to be the cheapest method of all, mostly because of how easy they are to move, unlike something like a bin made of pallets or other discarded wood.
See this page for some compost mistakes to avoid in your planning stage (or how to fix them if you've already made them).
You might like these
Composting; Tips, Tutorials and Troubleshooting e-Book
How to make perfect compost, customized to your specific garden and it's conditions with the Composting: Tips, Tutorials and Troubleshooting e-Book......
Organic Gardening Compost - make your own 'black gold'...
Make your own 'black gold'; Organic Gardening Compost...
Trash Can Compost saves time and room
Make Trash Can Compost for a compact composting system...
 Jacki Cammidge
AUTHOR BIO
Jacki Cammidge is a Certified Horticulturist who helps gardeners grow more with less through low-input, budget-friendly gardening and propagation. She has gardened her whole life, served as head propagator at a wholesale nursery, and handled thousands of rose and juniper cuttings.
Readers can find her at Frill Free on Facebook and Pinterest. Her frill-free approach was forged in northern BC, where horse manure, leaves, salvaged sawdust, and a deer-tested raised bed built her garden from scratch.